To move settings from staging to live without touching content, copy the individual options you changed, not the database. Record the old live values first so you can put them back, and leave out the options that describe the server, such as the site address and active plugins.
The risk is easy to underestimate. A staging site is a copy of live from some earlier day. Live has kept moving since: new orders, new comments, new form entries. Overwrite live with staging, and those are gone.
Why a database push is the wrong tool#
Hosts often offer a "push staging to live" button. Look at what it overwrites. Typical choices are the files, the whole database, or a list of tables. Exact options differ by host, so read the screen carefully.
Pushing the database replaces:
- Posts, pages and comments created on live since the copy
- WooCommerce orders, customers and stock
- Form plugin entries
- User accounts and password changes
- Every setting, including the ones that identify the live site
Settings sit in the same table as some of that data. The wp_options table holds both your tagline and the address of your site. So "just push the options table" is not a clean answer either: it brings the staging address with it, and some plugins keep working data in options, such as counters and queues.
A settings-only move is smaller and safer. It does take more care.
Decide what is a setting#
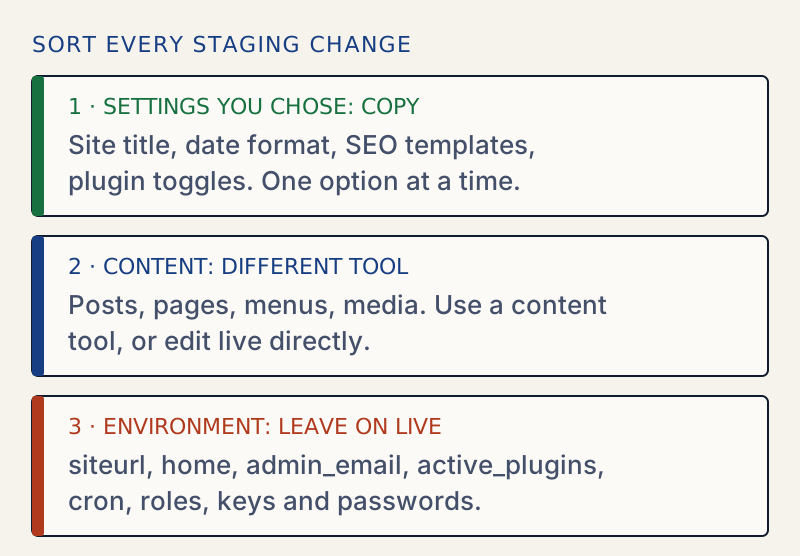
Sort your staging changes into three bins before you start:
- Settings you chose. Site title, date format, comment rules, SEO templates, a plugin's toggles. These are candidates.
- Content. Posts, pages, menus, media. These move with a content tool or by editing live. Do not move them as settings.
- Environment. Anything that identifies a server or an account, such as the site address, the admin email, active plugins, the cron queue, user roles, and keys or passwords. These stay as they are on live.
Write the list of option names for bin one. Everything below works from that list.
If you do not know the option name, change the setting on staging and compare before and after. The finding-changes guide shows the diff method. A short version:
wp option list --orderby=option_name --unserialize --format=json > ~/before.json# change the setting in the admin, then:wp option list --orderby=option_name --unserialize --format=json > ~/after.jsondiff <(jq -r '.[] | "\(.option_name)=\(.option_value)"' ~/before.json) <(jq -r '.[] | "\(.option_name)=\(.option_value)"' ~/after.json)The output names the option that changed. That is the name to put on your list.
Options that must not travel#
Do not copy these between environments:
siteurlandhome. They hold each site's own address.blog_public. This is the "Discourage search engines from indexing this site" checkbox under Settings → Reading. Staging sites usually set it. Copy it to live and your live site asks search engines to stay away.admin_email. It controls where system notices go.active_plugins. A list of plugin files. If staging has a plugin live does not, importing it can break live.cron. The scheduled-task queue.- Transients (
_transient_*,_site_transient_*) andrewrite_rules. WordPress regenerates them. - Names ending in
_db_version. They track which database upgrades have run on that site. - The user roles option (
wp_user_roles, with your own prefix). Overwriting it changes what every role can do. - API keys, tokens, license keys, SMTP passwords, and payment gateway settings. The keys on staging are often test keys. Putting them on live can switch real checkout to test mode or break it.
WordPress can tell you which kind of environment it is running in. On the test site used for this guide:
wp eval 'echo wp_get_environment_type();'printed local. The possible values are local, development, staging and production. WordPress takes it from the WP_ENVIRONMENT_TYPE constant or environment variable and falls back to production if neither is set. Some plugins use it to behave differently, so it is worth setting on staging.
Step by step#
Do these in order. Keep both terminals open so you do not mix up the sites. If you have SSH access to live from your own machine, WP-CLI can also run against a remote site with its --ssh option, but most people find it clearer to log into each server.
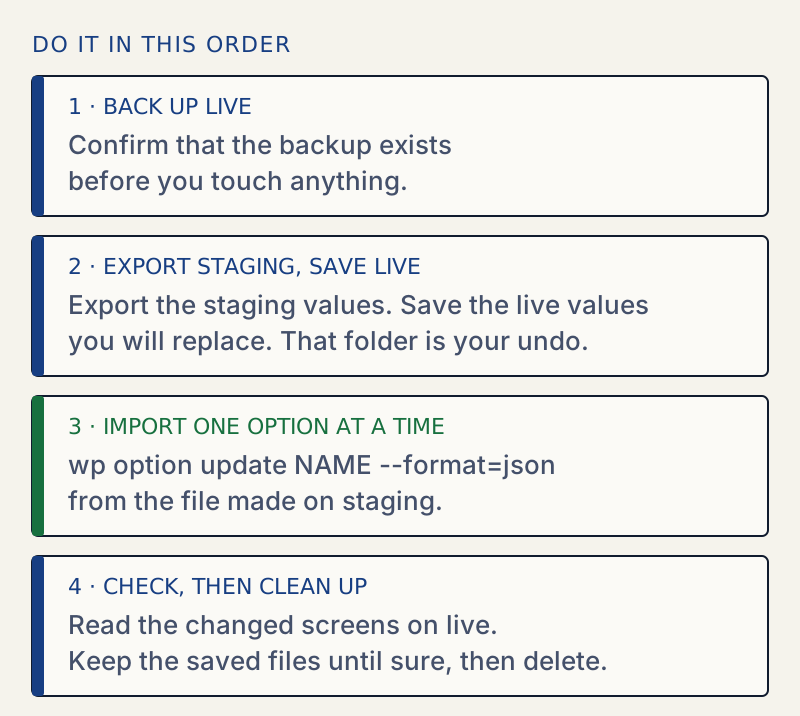
- Back up live. Use your host's backup or a database export, and confirm that the backup exists. Do not skip this, however small the change looks.
- Write the option list. One name per line, taken from the bin-one list above. Keep it short.
- Export the values from staging. This command writes one JSON file per option:
Terminal (on staging) mkdir -p ~/settingsfor opt in blogname blogdescription timezone_string date_format posts_per_page; do wp option get "$opt" --format=json > ~/settings/"$opt".jsondone - Read the files. Open them. Check that nothing in them is a secret and that you recognise every value.
- Save the live values you are about to replace. Run the same loop on live into a different folder, for example
~/settings-live-before. This is your undo. Keep both folders outside the WordPress folder, because anything inside it can be fetched by URL. - Copy the
~/settingsfolder to live, into the home folder there too. Use SFTP,scp, or paste the contents into files by hand. - Import on live. Run:
Terminal (on live) for opt in blogname blogdescription timezone_string date_format posts_per_page; do wp option update "$opt" --format=json < ~/settings/"$opt".jsondone - Read the output. WP-CLI says "Updated" when it changed a value and "Value passed ... is unchanged" when it did not. I ran this loop on a test site and every option reported "unchanged" when the values already matched, which is the result you want on a repeat run.
- Flush and check. Run
wp rewrite flushif you changed permalinks,wp cache flush, and clear any page cache. Then load the live site and the changed screens.
If something is wrong, run step 7 again from the ~/settings-live-before folder. That puts back what you replaced.
Arrays and plugin settings#
Plugins usually keep their settings in one array. Export and import that array the same way:
wp option get wpseo_titles --format=json > ~/settings/wpseo_titles.jsonwp option update wpseo_titles --format=json < ~/settings/wpseo_titles.jsonThat replaces the whole array on live with the staging version. If live has settings you did not change on staging, they are overwritten with staging's values. If you only changed one field, patch it instead:
wp option patch update wpseo_titles separator sc-dashPlugins that store a secret inside the same array are the awkward case. WP Mail SMTP is one: its settings are in a single option with mailer details inside it, and depending on the mailer chosen, credentials may sit in there too. Patch the specific fields you want and leave the rest of the array alone.
Plugin updates add a wrinkle. Staging and live may run different plugin versions, and a newer version may store settings in a different shape. Match the versions first. wp plugin list --fields=name,version shows each site's versions.
Theme settings and IDs#
Customizer values live in one option per theme. Read them with:
wp theme mod listPlain values such as colours and text copy over fine with wp theme mod set. Values that are numeric IDs do not. A logo, header image, or menu location points to a media or menu ID from the staging database. On live, that ID is a different file, or nothing.
For those, recreate the item on live, note its new ID, then set the mod.
Content that comes along for the ride#
Some "settings" are really content in disguise:
- Menus are stored as terms and posts. Their placement is a theme mod.
- Widgets are stored in options, but the blocks inside them can reference posts by ID.
- Block theme styles and templates are stored as posts.
- Custom CSS from the Customizer is stored as a post, referenced by
custom_css_post_id.
If you changed one of these on staging, treat it as content. Copy it with the content export tool or recreate it by hand on live.
Addresses inside content#
If you did bring content along, URLs inside it may still carry the staging address. wp search-replace rewrites them and understands serialized data. Always run a dry run first, and skip the guid column, which should never change:
wp search-replace 'https://staging.example.com' 'https://example.com' --dry-run --skip-columns=guidThe --dry-run flag reports how many replacements it would make and changes nothing. Run it again without the flag only after you have read the report. On a clean test it printed Success: 0 replacements to be made.
Do not use raw SQL for this. A plain text replace breaks serialized values whose length changes.
After the move#
- Open the changed screens on live and read them. Do not trust "Updated".
- Check Settings → Reading and make sure search engines are not discouraged.
- Send one test email if you touched mail settings.
- Keep the
~/settings-live-beforefolder until you are sure. Delete it, and~/settings, afterwards, because they may contain secrets.
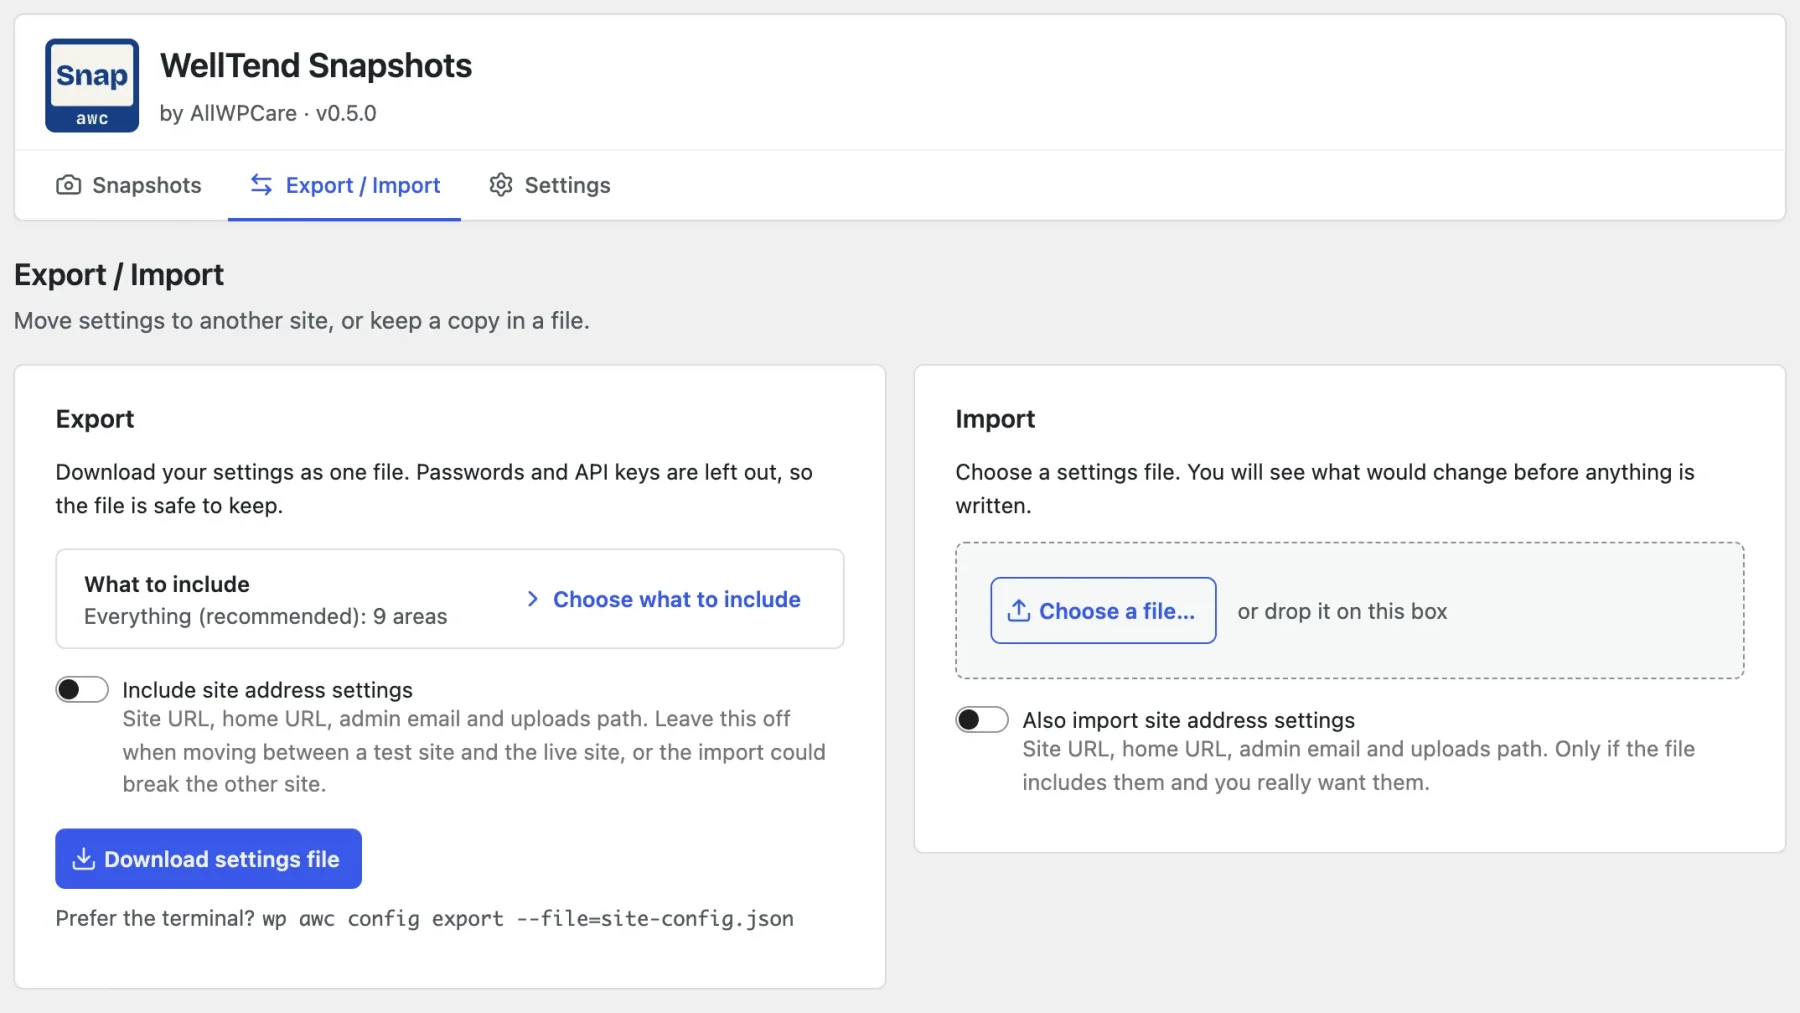
WellTend Snapshots 0.5.0 does the settings part from the admin, without a terminal. On Export / Import it downloads your settings as one file, leaves passwords and API keys out, and keeps "Include site address settings" off until you switch it on. On the other site you choose the file and it shows what would change before anything is written. It covers settings only: menus and widgets are content in disguise (see above) and still need the content route.
Compare two snapshots, or a snapshot with the live site, and read changes like "Comments: open → closed". The raw key is one click away.
The weak point of this routine is that the loop writes first and you check afterwards. A safer order is to read the live value and the incoming value side by side before you apply anything. You can do that by hand: for each option, print both and compare them.
When a database push is fine#
Sometimes the push is the right call. If live is a brochure site with no logins and no forms, and you froze edits before cloning staging, a full push loses nothing. Freeze live for the whole duration of the push, push, fix the addresses, and flush caches. Core maintenance mode (wp maintenance-mode activate) lasts only 10 minutes, then WordPress ignores it, and a database push also replaces the maintenance state with staging's. For a longer freeze, use your host's maintenance toggle or a maintenance plugin, and check it is still on when the push finishes. Anywhere content is created by visitors, use the option-by-option route.
Related: export and import WordPress settings and find and undo changed settings.
FAQ
Can I push a staging database to live to move settings?
Only if you are willing to lose everything that changed on live since you made the staging copy. A database push replaces orders, comments, form entries and posts along with the settings. For a settings-only change, copy the individual options instead.
Which settings should never go from staging to live?
siteurl, home, admin_email, active_plugins, cron, transients, rewrite_rules, database version options, the user roles option, any API keys or payment credentials, and blog_public, which staging sites often set to discourage search engines.
Do my staging hosting tools move settings only?
It depends on the host. Many push buttons copy files, the whole database, or chosen tables. Few copy individual options. Read what your host's tool says it overwrites before you press it, and take a backup of live first.
What if the setting is stored in an array?
Export it with wp option get NAME --format=json and import it with wp option update NAME --format=json. To change one nested key, use wp option patch update.
How do I test the move before touching live?
Make a second copy of live, run the import there, and check it. If you cannot, run the import on live in the quietest hour, with a fresh backup and a saved copy of every option you are about to change.
Sources
- WP-CLI: wp option · get and update; --format=json appears in its examples
- WP-CLI: wp option patch
- WP-CLI: wp search-replace · Handles serialized data
- WP-CLI: wp rewrite flush
- WP-CLI: wp maintenance-mode
- Core: load.php (maintenance mode check) · wp_is_maintenance_mode() and the 10-minute window
- Core: wp_options table definition (schema.php) · Definition of the wp_options table
One email when something breaks or changes.
New plugins and re-tested guides, about twice a month. Never a sales pitch.